Kinoa – Manual
Premium skin for Kodi 21 "Omega" · Windows · Amazon Fire TV · Android TV boxes
1. Before you start
- Kodi 21 "Omega" must be installed. Check your version in Kodi under Settings → System information. Kodi is free at kodi.tv/download.
- You need the file skin.kinoa-1.0.0.zip from your purchase e-mail. Do not unzip it! Kodi installs the zip file directly.
- Allow it once in Kodi: Settings → System → Add-ons → "Unknown sources" on, confirm with "Yes". (If it is missing, set the settings level at the bottom left to "Advanced".)
2. Installing on Windows
- Download the zip file with the link in your purchase e-mail. It ends up in your Downloads folder.
- Start Kodi and open Settings → Add-ons → Install from zip file.
- Choose Home folder or C: → Users → your name → Downloads → skin.kinoa-1.0.0.zip.
- After a few seconds Kodi asks whether to switch to the new skin: Yes. Then "Keep this change?": Yes.
- Restart Kodi once. Done.
Microsoft Store version of Kodi: installation works the same way. The file browser shows your Downloads folder under C:.
3. Installing on an Amazon Fire TV Stick
The easiest way to get the zip file onto the stick is the free app Downloader (by AFTVnews, in the Amazon Appstore).
3.1 Install and allow Downloader
- On the Fire TV: search → "Downloader" → install.
- Settings → My Fire TV → Developer options → Install unknown apps → Downloader ON. (No developer options? Open My Fire TV → About and click the device name 7 times.)
- Start Downloader and allow access to photos, media and files.
3.2 Download the zip file
- Type the download link from your purchase e-mail into "Enter a URL". Tip: shorten long links with a link shortener on your phone or PC first.
- If a download page opens, click "Download". Downloader saves the file to the Download folder.
- If Downloader offers "Install", do not install (it is not an app) – just close with "Done".
3.3 Install in Kodi
- Start Kodi → Settings → System → Add-ons → "Unknown sources" ON.
- Settings → Add-ons → Install from zip file → External storage (or /storage/emulated/0) → Download → skin.kinoa-1.0.0.zip.
- Confirm the skin switch with Yes, then "Keep this change" with Yes.
3.4 Other ways onto the stick
- Send Files to TV (free for phone and Fire TV): download the zip on your phone and send it over Wi-Fi; it lands in Download.
- USB stick with OTG adapter: copy the zip to a USB stick and choose the stick in "Install from zip file".
- Network share (SMB): put the zip in a shared PC folder and add it as a source in Kodi.
4. Installing on an Android TV box
- Install Kodi from the Google Play Store (or from kodi.tv).
- Get the zip onto the box – easiest with a USB stick. Alternatively open the download link in the box's browser, or use "Send Files to TV" or Downloader as on the Fire TV.
- On first start Kodi asks for file access – Allow.
- Settings → System → Add-ons → "Unknown sources" ON.
- Settings → Add-ons → Install from zip file → USB stick or External storage → Download → skin.kinoa-1.0.0.zip → confirm the skin switch with Yes.
5. Setting up Kinoa
Choose a design
Main menu → Settings → Design → Themes:
- Kinoa Gold – marble band, dark gold selection with a blue underline (default).
- Kinoa Black – black grunge band, blue selection.
- Kinoa Kids – colorful kids band, own wallpapers and start picture.
Wallpapers, screensaver, start picture
- Wallpapers change automatically every 15 seconds in the menu.
- Own fixed picture: Design → Themes → "Gold/Black: fixed background" or "Kids: …".
- Screensaver: starts after 10 minutes without input. Switch it off under Design → Effects.
- Start picture when Kodi starts (5 seconds, any key skips): can be switched off under Design → Effects.
- Camera zoom and living effects are off by default. On powerful devices you can switch them on under Design → Effects.
Language
Kinoa follows Kodi's language: Settings → Interface → Regional → Language (English or Deutsch). The default menu names are created in the language that is set when Kinoa starts for the first time.
6. Menu items, submenus and widgets
The main menu is the band at the bottom. Every item can open a target, have a submenu (the row below the band) and a widget (the row of posters above the band). You set all of this in the menu editor.
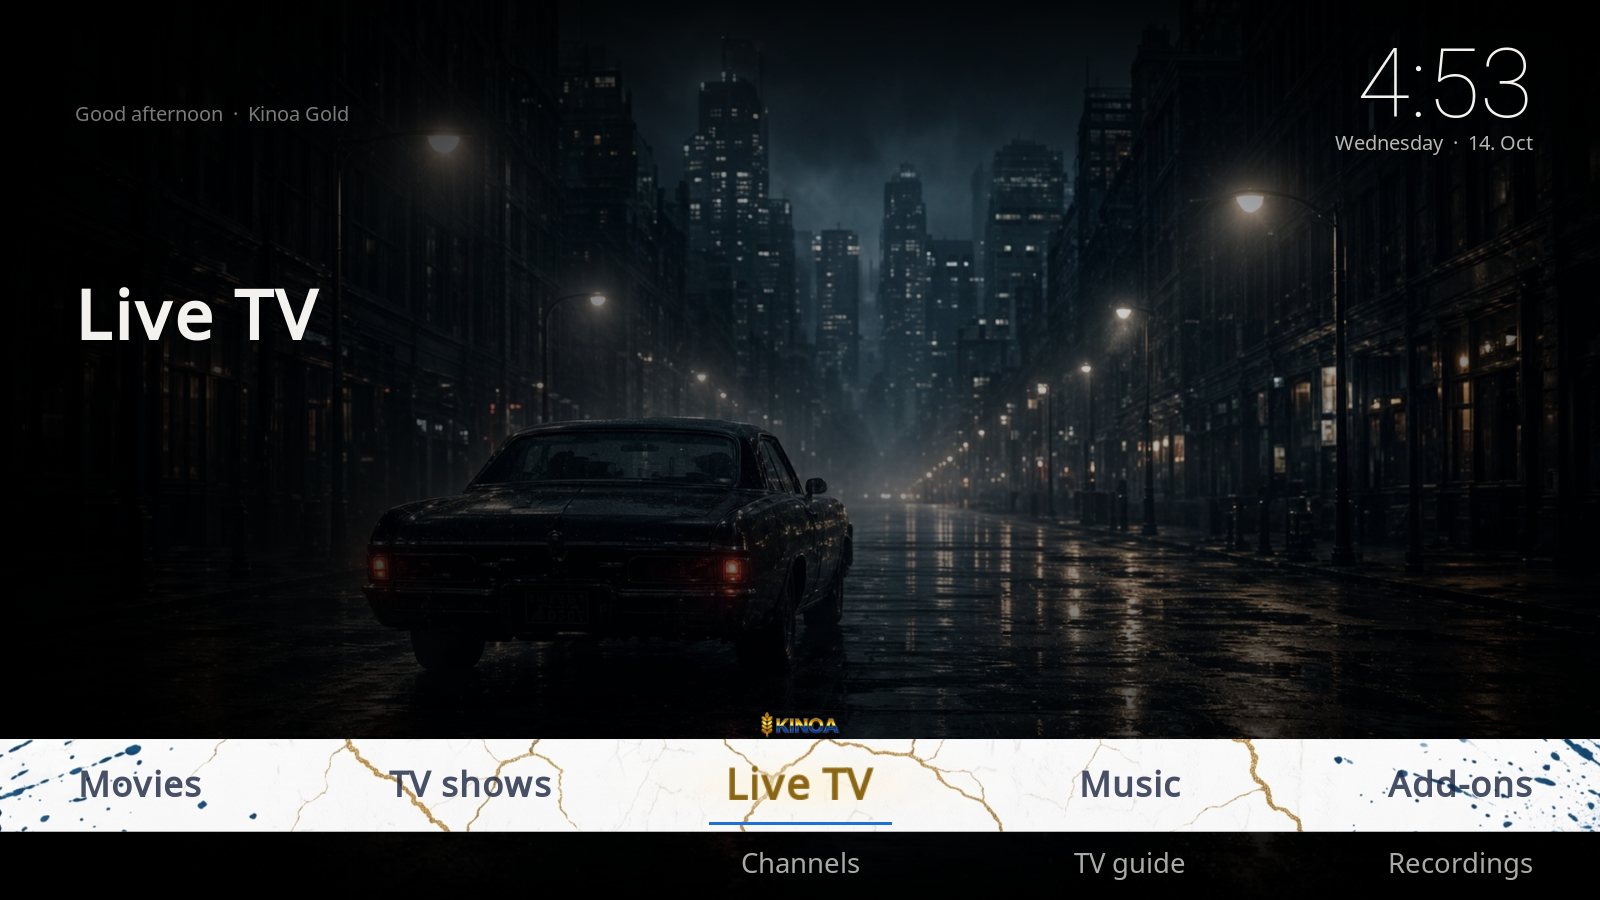
6.1 Open the menu editor
- Go to Edit menu in the main menu and press OK, or
- Settings → Design → Main menu → Open menu editor.
On the left you see the Main menu list with 14 slots, in the middle the actions for the selected item, at the bottom the item's name, target and widget.
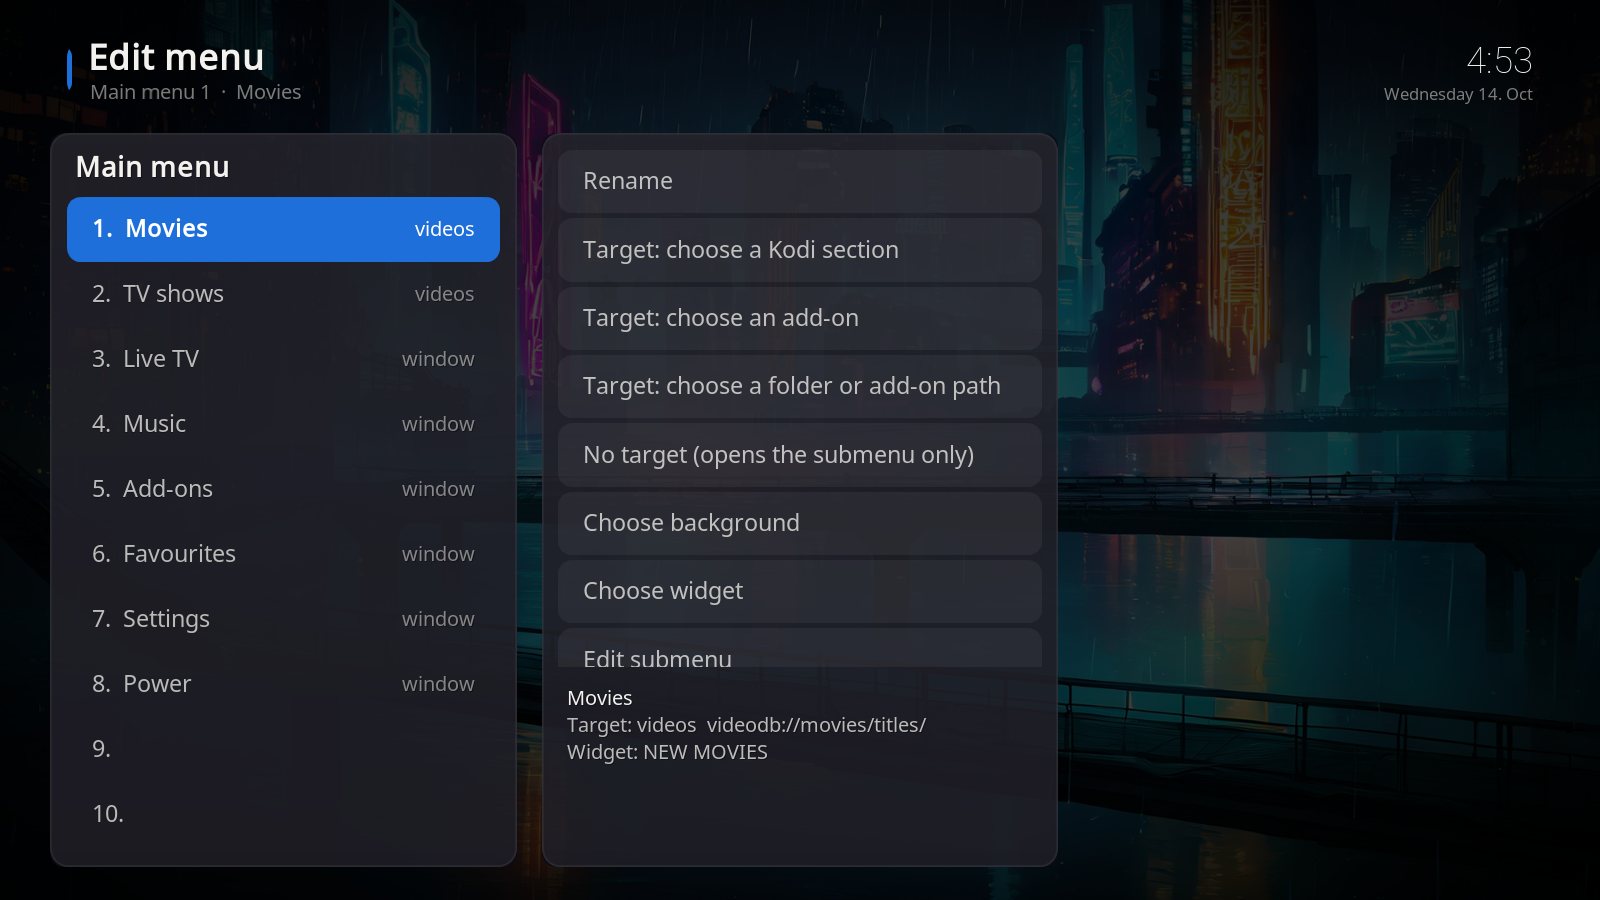
6.2 Edit a menu item
- Select the item on the left (e.g. "1. Movies") and press OK. The actions in the middle now apply to this item.
- Rename: type the new name and confirm with OK.
- Set the target – what opens on click:
- Target: choose a Kodi section – e.g. Movies, TV shows, Live TV, Music, Favourites, Settings.
- Target: choose an add-on – one of your installed add-ons.
- Target: choose a folder or add-on path – a folder on the device or a specific section inside an add-on.
- No target – the item only opens its submenu.
- Move left/right changes the order in the band.
- Delete item removes the item from the main menu.
New menu item: choose an empty slot (e.g. "9."), type a name and choose a target. Empty slots are not shown in the main menu.
6.3 Add a widget
- Select the main item on the left and press OK.
- Choose widget – the choice appears on the right:
- New movies, New episodes, Continue watching, New albums – from your Kodi library,
- Favourites – your Kodi favourites,
- Video add-ons – your installed video add-ons,
- Own path (add-on/folder) … – any folder or add-on section,
- No widget – no row above the menu.
- Choose an entry and press OK. The row appears in the main menu whenever the item is selected. Press up to move into it.
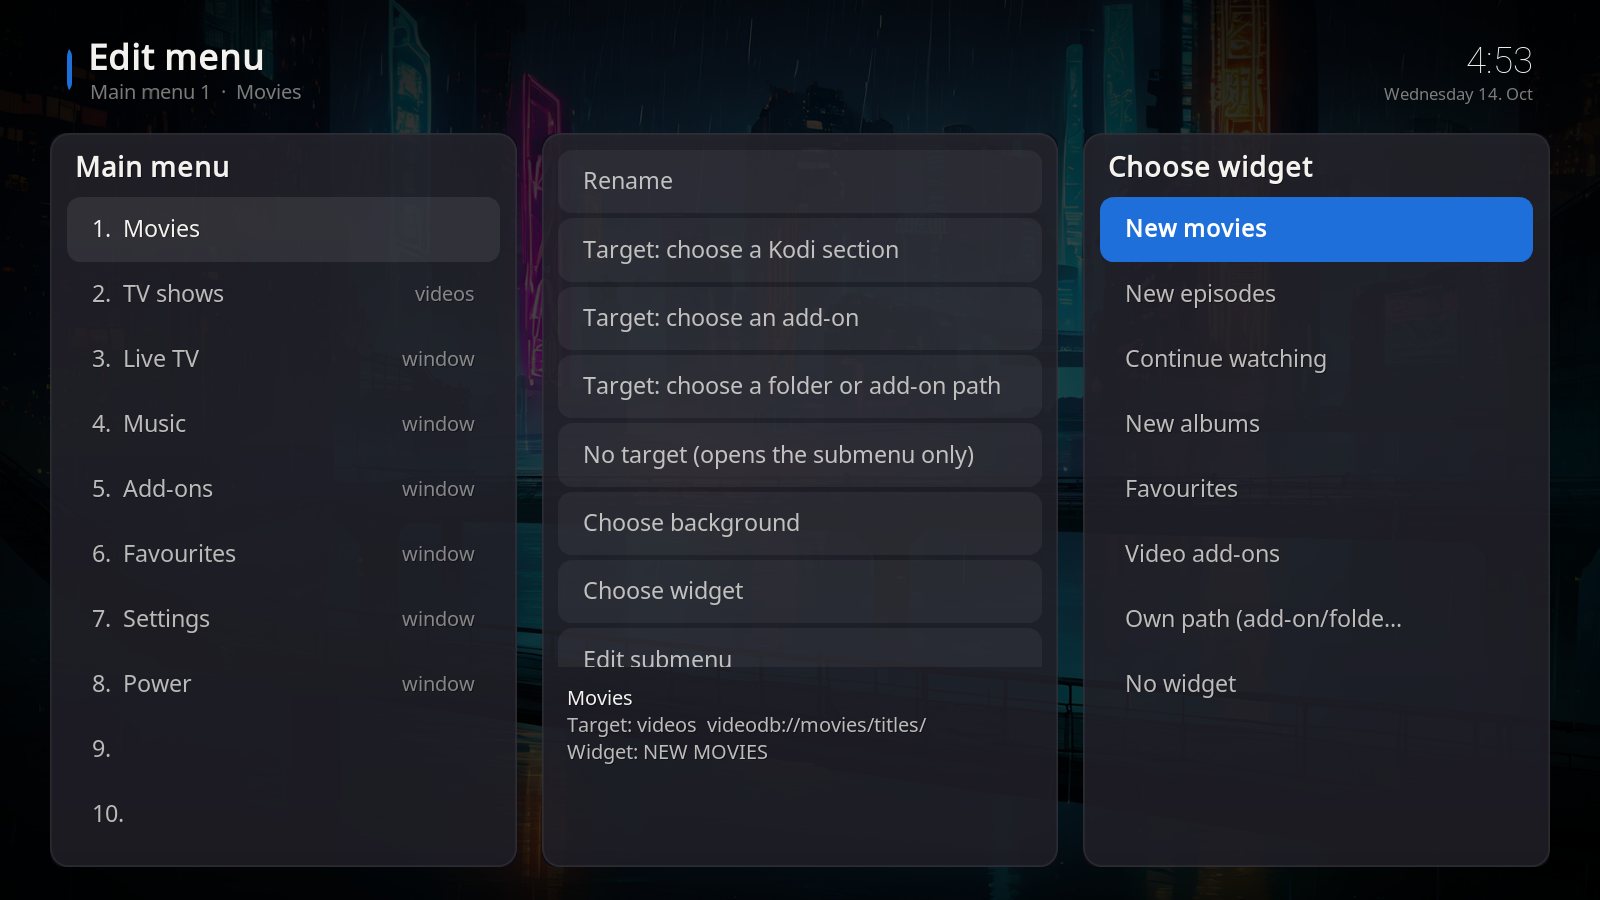
If a widget row stays empty, its source has no content yet. "New movies" and "New episodes" need a Kodi library (Videos → Files → Add videos and set the content type). An empty source simply hides the row.
6.4 Edit a submenu
- Select the main item on the left (e.g. "3. Live TV") and press OK.
- Edit submenu – the Submenu list with 10 slots appears on the left.
- Choose a sub item and rename it and set a target as above. For a new sub item use an empty slot.
- Delete item removes a sub item.
- Back to the main menu item returns to the main list.
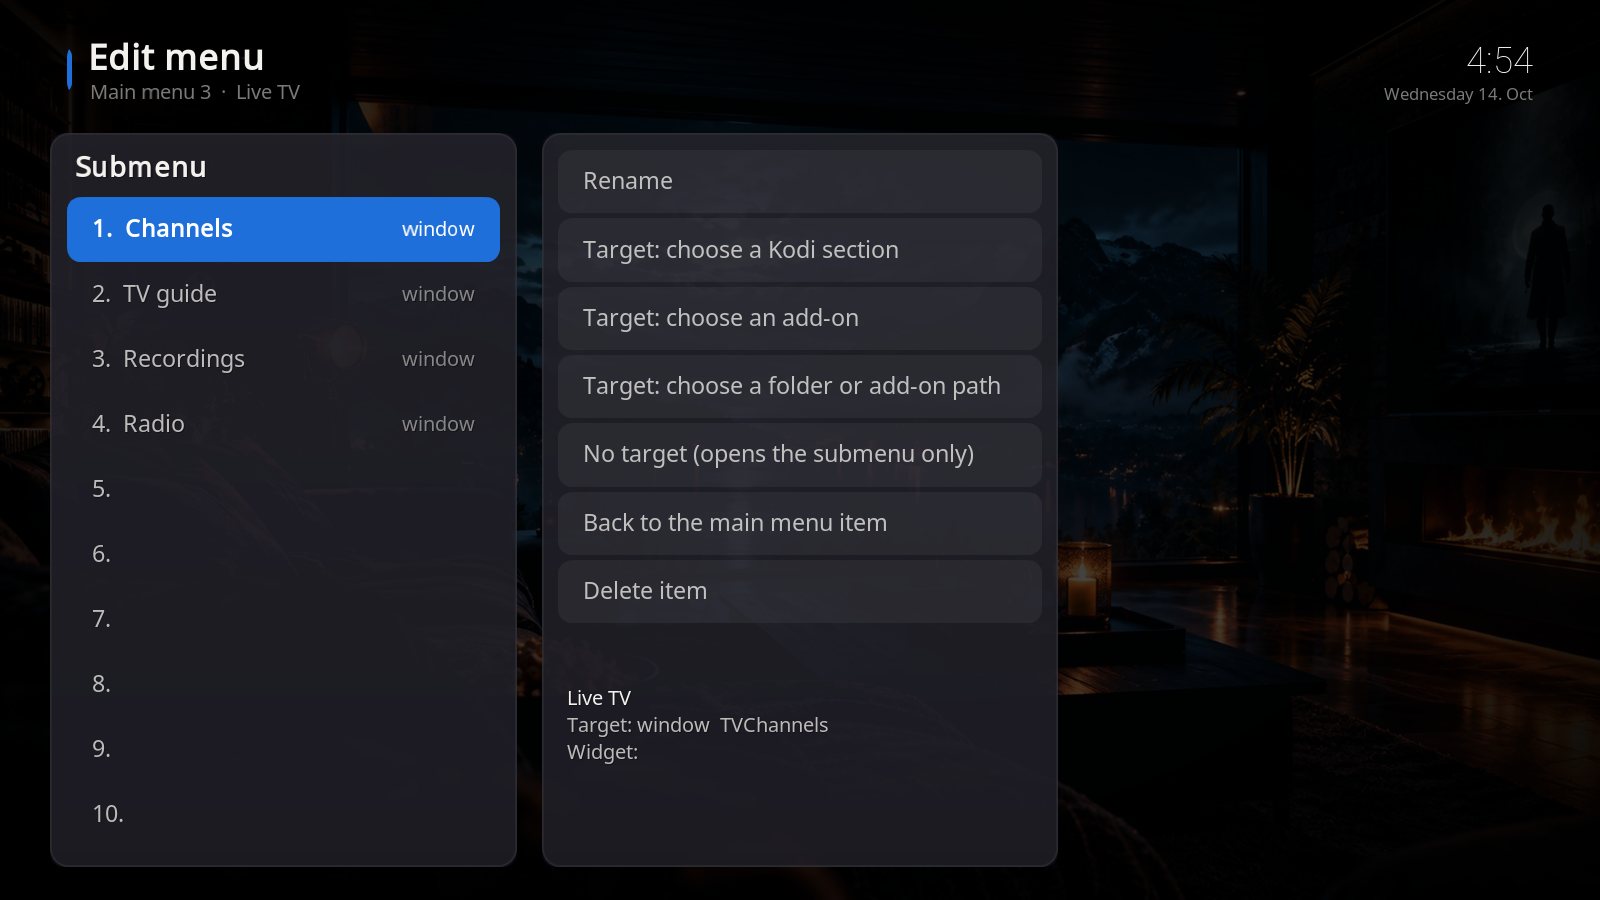
In the main menu the sub items are shown in the row below the band. Press down to select them.
6.5 Done
Press Back to leave the editor. Everything is saved automatically and applies immediately. To start over: Design → Main menu → Restore default menu.
7. Updating and uninstalling
- Update: install the new zip file the same way via "Install from zip file". Your settings and menu are kept.
- Back to the default skin: Settings → Interface → Skin → Estuary.
8. Troubleshooting
- "Dependencies not met" / installation fails: your Kodi is too old. Kinoa needs Kodi 21.
- Zip file not shown (Fire TV/Android): Kodi has no file access. Allow "Storage/Files" under Apps → Kodi → Permissions in the Android/Fire TV settings.
- "Unknown sources" is missing: set the settings level at the bottom left to "Advanced".
- Screen dims after 3 minutes: Kodi's own screensaver is active. Settings → Interface → Screensaver → Mode: None – Kinoa takes over.
- A menu item opens nothing: set a target in the menu editor.
- Kodi stutters on a Fire TV Stick: switch everything off under Design → Effects.
Support: support@kinoaskin.com
9. Important legal notice
Kinoa is only a skin (user interface) for Kodi and contains no add-ons and no content. Using add-ons or sources that provide copyrighted content without the rights holders' permission is illegal and may lead to criminal and civil prosecution. Please use Kodi only with legal content, such as your own media collection or legal streaming services.
Kodi® is a registered trademark of the XBMC Foundation. Kinoa is an independent product and is not affiliated with the XBMC Foundation.